So sorry, no pics today, and didn't realize I haven't done anything to post since the 3rd. Gee, I am a slacker. Well, have no fear, I'm going to my stamp group tonight... I also call them my therapy group time. I'll make something post worthy and share. I promise.
In the meantime, been dedicating alot of time to this one project, no nothing big like a DT or anything like that... but have to keep underwraps because it involves some people who read this blog... so that's that.
TTFN, I will post something tomorrow. :)
Tuesday, January 8, 2008

Thursday, January 3, 2008
Quick card...
I only had a 10-minute notice from Mom to make this for a friend of hers. All I was given was that the lady's favorite color is purple and she like butterflies. So, naturally purple butterflies is easy to do. But I just rolled the cardstock thru my nifty Cuttlebug and added the butterfly on it. Which is fine, just that I'd think I would've liked to add something more... just didn't have to time to dig up anything. I think I like the combo enough to remake it (I tend to not alot of times), so what shall I add? I've solicited the Stamping Critique ladies to help, but if you have any suggestions, I'm all ears.

Supplies:
Cardstock & Stamp by SU

Supplies:
Cardstock & Stamp by SU
Wednesday, January 2, 2008
Snow Writer VS Liquid Applique
Happy 2008!!! Hopefully everyone had a great time ringing in the new year.
Now, I know the holidays are over, but I can't help myself but to go back and play with some stuff that I didn't get to this season. So, I decided to write a compare and contrast for Snow Writer & Liquid Applique.


Now, I know the holidays are over, but I can't help myself but to go back and play with some stuff that I didn't get to this season. So, I decided to write a compare and contrast for Snow Writer & Liquid Applique.
I heard about Snow Writer from the HRR herself, Julie Ebersole on SCS. She was telling someone who is looking for something that makes a good snow. And she suggested Snow Writer. Out of curiosity, plus a gift card to Michael's & the product being on sale, I'd figured, what the hey.
So, this is the original image, and the Snow writer itself:

The Snow Writer has a fine tip, so it can go on detail images just fine. Aside from cardstocks, it is really designed to go on any type of surface (e.g. wood, glass, plastic). It goes on pudgy, but it hardens as it dries. Since it has a wee-tad of oil in the mixture, it sometimes comes out more consistant than others.
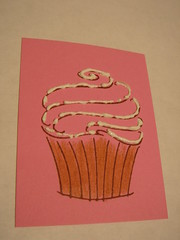
Once you've applied it, sat it aside. It will harden as it dries. This is what it looks like when it dries.
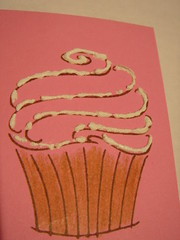
Then on to Liquid Applique. Frankly, I've had a tube about 10 years ago (yes I've been playing w/ it for that long). However, since I haven't played w/ it for years, it just wasn't cooperating. So, I bought a new tube instead. I remember I had a yellow tube because I believe I was trying to stamp Pooh and of course, he's yellow-looking. But, I digress. The point was, it's been around for a while, and making a strong come back.
So, here's the Liquid Applique and the original image:


As you can see, it goes on creamy. It does have a finer tip, and it can allows for finer images. Except you don't need to fill the images as you do w/ the Snow Writer. Because...
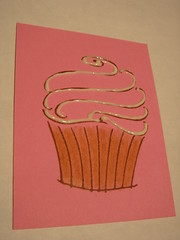
Once you heat it up...
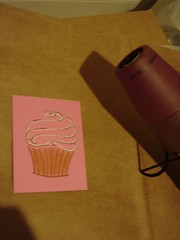
It will turn puffy. And once it puffs up, it will hide any spot you miss, unless it's huge like the top of this cupcake. But you get the idea. Cream = Puff. Don't need to excessively add cream, because it doesn't 'puff extra' necessary.
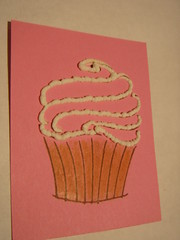
Here's what they look like side by side. As you can see, the Liquid Applique is puffy and 'creamier' looking compare to the snow writer. But then, you're not afraid to squish the Snow Writer because it hardens.

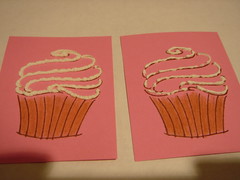
Here's a close-up for the Applique:

Here's the close up for the Snow Writer:
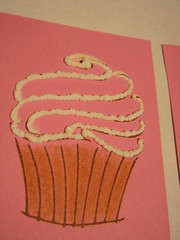
Here's the close up for the Snow Writer:
As you can see, one comes out better consistent than the other. My thought is, if I were to use Snow Writer on smaller 'area' for snow, it will come out fine, as compare to Applique. Mainly because, I need to spare 'room' for the Applique to puff up. I've used Applique as snow on window and such, which was fun, but since my image was tiny, the snow kinda took away from the focal point instead of enhancing. So, maybe I'll give it another try. But, as falling snow, Snow Writer will do the job without the heat gun.
Image: by Hero Arts
Friday, December 28, 2007
To Flock or Not to Flock, that is the question...
Ok, this is really more of a product review for the Glue Pad vs. Zig 2 Way Glue Pen more than flocking.

But just want to let you know what started it all was because I was not able to put Fun Flock on my cards successfully, that that started me down this path. (For those of you who don't know what Fun Flock is, skip down, I'll explain.)
So, just for a test run. I had tried using the Glue Pad to flock, but to no avail. So, I decided to put glitter on it instead. By just glancing at the image (it's a tad out of focus ~ another story later), the left one is stamped w/ the Glue Pad and the right one is stamped with regular ink and then filled in w/ the Zig 2-way glue pen.

As you can see, the stamped image with the stamp pad is very light, compared to the image used the 2-way glue pen. Now, I will say, it's really a tad of unfair comparison because one is stamped w/ the ink pad and then sprinkled glitter on it. The other is stamped, filled w/ glue, then sprinkle glitter on. So, naturally, the area expose to glue is more on the latter than the former, BUT! I'm thinking, if you tell me your ink pad will glue things, I'm thinking that would be the case.
So, on to flocking... In case you haven't seen these before, apparently this craft phenomenon was from the 70s/80s (?), and now making a come back. It's great if you use flock to be the little bears body, or the bunny's tail. I'm just in love w/ the flocking idea. I think that was even solidified by my Flock & Foil kit. I just love the feeling of it, it's fun. So, naturally, you'd think, why not give it a try, right? Hmmm...
So, this is the original image:

Thought I'd give you some ground of comparsion, and you won't look at the following picture wondering, what the...
So, here: I was over zealous and thought, I can just flock the entire inked area and expose the nice swirl as the image has to offer:

Urm... not so much. As you can see, alot of the flock kinda lumped together. That's the draw back, you can dump as much as you want, and press, the unfortunate part is that if they're stuck, you don't quite want to remove any lumps because it may be attached to some more fuzz. So, by you removing it, it will create a small 'bald spot', if you will.
Here's where I decided to instead flocking the entire thing, just do the opening parts of the image. So, it's the negative of the above image:
 As you can see it turns out much better. Less lumpy, and while you don't get a clear, precise image, since it's fuss, that's kinda expected.
So, what have we learned? Well, while Glue Pad, indeed does not require heating like Palette does, it also doesn't have that 'strong' bond as one might thing. I have read tips on this where if you stamp your image and wait for 10 mins and try to bond whatever you're trying to stick, it may work better. That theory will be tested tonight. What is not shown was a Happy Birthday that I stamped and flocked and it stuck ok. It's thinner flock, and definitely not as clear as the image. But, in theory, it worked.
Glue pad, as many had said, really needs to be juiced up frequently. It's not a biggie though, since you don't have to heat it. I've read somewhere that people had used the back of a plastic spoon and 'message' the pad and kinda get the ink re-surface. I have no idea if that's any truth to it, just one small teaspoon will last a good while.
Meanwhile, the Zig 2-way glue pen works better, (as mentioned before, unfair comparison) you're practically putting glue directly onto the image, thus create a better chance of getting the flock to stick. So, I recommend that way of putting flock to your project. I've also read people put Elmer glue as well. Whatever works for you. The other thing was some people had suggested using Sakura's Quickie Glue Pen, that's not as good, because the glue dispense is so little that you either have to work quick or somehow apply more than what it can dispense in order to glue your flock. But, if you're doing that I vote for the Zig because they do have different dispense tips available.
Hope you enjoyed my review. The DH 'fixed' my camera as one of my Xmas gift, the problem is all my setting I had previously is all wonked out. So, some of the pics aren't as clear as it should be. We'll get working on that.
Have a great weekend!
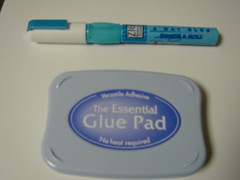
But just want to let you know what started it all was because I was not able to put Fun Flock on my cards successfully, that that started me down this path. (For those of you who don't know what Fun Flock is, skip down, I'll explain.)
So, just for a test run. I had tried using the Glue Pad to flock, but to no avail. So, I decided to put glitter on it instead. By just glancing at the image (it's a tad out of focus ~ another story later), the left one is stamped w/ the Glue Pad and the right one is stamped with regular ink and then filled in w/ the Zig 2-way glue pen.

As you can see, the stamped image with the stamp pad is very light, compared to the image used the 2-way glue pen. Now, I will say, it's really a tad of unfair comparison because one is stamped w/ the ink pad and then sprinkled glitter on it. The other is stamped, filled w/ glue, then sprinkle glitter on. So, naturally, the area expose to glue is more on the latter than the former, BUT! I'm thinking, if you tell me your ink pad will glue things, I'm thinking that would be the case.
So, on to flocking... In case you haven't seen these before, apparently this craft phenomenon was from the 70s/80s (?), and now making a come back. It's great if you use flock to be the little bears body, or the bunny's tail. I'm just in love w/ the flocking idea. I think that was even solidified by my Flock & Foil kit. I just love the feeling of it, it's fun. So, naturally, you'd think, why not give it a try, right? Hmmm...
So, this is the original image:

Thought I'd give you some ground of comparsion, and you won't look at the following picture wondering, what the...
So, here: I was over zealous and thought, I can just flock the entire inked area and expose the nice swirl as the image has to offer:
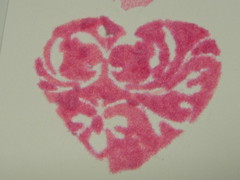
Urm... not so much. As you can see, alot of the flock kinda lumped together. That's the draw back, you can dump as much as you want, and press, the unfortunate part is that if they're stuck, you don't quite want to remove any lumps because it may be attached to some more fuzz. So, by you removing it, it will create a small 'bald spot', if you will.
Here's where I decided to instead flocking the entire thing, just do the opening parts of the image. So, it's the negative of the above image:
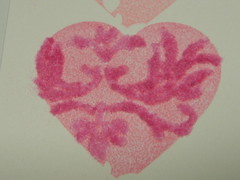 As you can see it turns out much better. Less lumpy, and while you don't get a clear, precise image, since it's fuss, that's kinda expected.
So, what have we learned? Well, while Glue Pad, indeed does not require heating like Palette does, it also doesn't have that 'strong' bond as one might thing. I have read tips on this where if you stamp your image and wait for 10 mins and try to bond whatever you're trying to stick, it may work better. That theory will be tested tonight. What is not shown was a Happy Birthday that I stamped and flocked and it stuck ok. It's thinner flock, and definitely not as clear as the image. But, in theory, it worked.
Glue pad, as many had said, really needs to be juiced up frequently. It's not a biggie though, since you don't have to heat it. I've read somewhere that people had used the back of a plastic spoon and 'message' the pad and kinda get the ink re-surface. I have no idea if that's any truth to it, just one small teaspoon will last a good while.
Meanwhile, the Zig 2-way glue pen works better, (as mentioned before, unfair comparison) you're practically putting glue directly onto the image, thus create a better chance of getting the flock to stick. So, I recommend that way of putting flock to your project. I've also read people put Elmer glue as well. Whatever works for you. The other thing was some people had suggested using Sakura's Quickie Glue Pen, that's not as good, because the glue dispense is so little that you either have to work quick or somehow apply more than what it can dispense in order to glue your flock. But, if you're doing that I vote for the Zig because they do have different dispense tips available.
Hope you enjoyed my review. The DH 'fixed' my camera as one of my Xmas gift, the problem is all my setting I had previously is all wonked out. So, some of the pics aren't as clear as it should be. We'll get working on that.
Have a great weekend!
Tuesday, December 25, 2007
Santa is here!

Wishing you and your family a happy and joyous holiday! Hopefully Santa got you what you wanted. If not, there's always next year.
As a crafter, if you tell people you want gift cards to craft stores, that's the most practical. That way, they don't have to guess and you don't have to look disappointed when you ask for one thing and they give you another. Hahaha... not that it'd ever happened to me.
I've got an Everyday Stack by DCWV, gift cards to Michael's, Hobby Lobby, and Target. I love Target... I think those 3 places are one of those: I tell myself I only need one thing and $20+ later... what happened, type places.
Anyway, may you guys have a great one. Keep crafting!
Thursday, December 20, 2007
Special dedication....
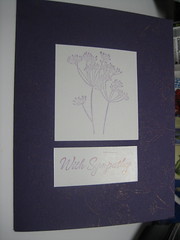
While both cards look seemingly similar, they mean greatly to me and the people they're going to. I know many crafters hate to make Sympathy cards. That's the last thing anybody wants to make. However, sadness is part of life, unfortunately. So, this is a mini dedication to them.

This card I made for my friend Dori, who was ever so anxious to find out recently that she's pregnant. They were sorta working on it, but not desparately or anything. They are just ready. As a matter of fact, they were going to tell the family about the news on Xmas day. However, Monday, when she went to the doctor, they can't find a heartbeat. That must be the most devastating thing one can get from the doctor. She was supposed to do something for me Sunday, and while she was trying to be responsible and tell me she can't make it, she also can't help herself and broke down. I received the news when I was at Target getting some Xmas stuff, and when she cried, I started to cry. I'm sure people at the store much thing something crazy is with me. So, I made that card for her.

This one is going to my friend Louise in Seattle. She lost her father last weekend. He had been sick for quite sometime, as a matter of fact they thought he wasn't going to make it till the end of the year when he found out he had cancer. During that time, his wife (my friend's mom) had left him for another guy. Her sister moved to another state, and alot of changes. Through it all, her dad put up a happy face and make sure to tell everyone that things will be ok. I really admire him for doing that. Because I know how my friend is distracted by his health, but he makes sure everyone keeps on going. As time gets near, she flew home to be by his side, and even then, he told her to go home. She did, and 36 hours later... well, you know. She had to turn around and go back.
My heart sank for both of them. Mainly because we are all the same age. Both scenario can easily be me that it happens to. I guess I've always think that nothing bad can happen to us, people our age, health. Not sure if some lesson is to be learned here, but for now, just grieving as they grief.
Supplies:
Cardstock by SU
Stamps by SU (Garden Silhouette, Warm Regards)
Ink by PearlEx Two Tone
*I tried to stamp the background to have some gold shimmering w/ the same image as the center image, but it looked too faint. However, when you stamp on the white CS it looks like the color the pad is supposed to be. :)
This card I made for my friend Dori, who was ever so anxious to find out recently that she's pregnant. They were sorta working on it, but not desparately or anything. They are just ready. As a matter of fact, they were going to tell the family about the news on Xmas day. However, Monday, when she went to the doctor, they can't find a heartbeat. That must be the most devastating thing one can get from the doctor. She was supposed to do something for me Sunday, and while she was trying to be responsible and tell me she can't make it, she also can't help herself and broke down. I received the news when I was at Target getting some Xmas stuff, and when she cried, I started to cry. I'm sure people at the store much thing something crazy is with me. So, I made that card for her.
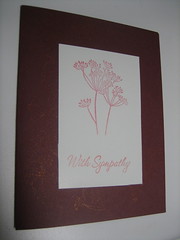
This one is going to my friend Louise in Seattle. She lost her father last weekend. He had been sick for quite sometime, as a matter of fact they thought he wasn't going to make it till the end of the year when he found out he had cancer. During that time, his wife (my friend's mom) had left him for another guy. Her sister moved to another state, and alot of changes. Through it all, her dad put up a happy face and make sure to tell everyone that things will be ok. I really admire him for doing that. Because I know how my friend is distracted by his health, but he makes sure everyone keeps on going. As time gets near, she flew home to be by his side, and even then, he told her to go home. She did, and 36 hours later... well, you know. She had to turn around and go back.
My heart sank for both of them. Mainly because we are all the same age. Both scenario can easily be me that it happens to. I guess I've always think that nothing bad can happen to us, people our age, health. Not sure if some lesson is to be learned here, but for now, just grieving as they grief.
Supplies:
Cardstock by SU
Stamps by SU (Garden Silhouette, Warm Regards)
Ink by PearlEx Two Tone
*I tried to stamp the background to have some gold shimmering w/ the same image as the center image, but it looked too faint. However, when you stamp on the white CS it looks like the color the pad is supposed to be. :)
Wednesday, December 19, 2007
Santa baby
Well, 5 more shopping days left till THE day... I hope everyone had their shopping done.
I took yesterday off from work just to do that. I had gotten them wrapped and all sorts of good stuff....
This is another stamp from InkyAntics, I just love their sassy Xmas girl. So, cool! I wish I have the lyrics to Santa Baby song in a stamp or rub on, that way, I can stick them all over the place. =D
Anyway, have to go catch up on all the paper they put on my desk from yesterday...
Supplies:
Card, Ribbon, Rub-on by Making Memories
Stamp by Inky Antics
3D tree by K&Co.

I took yesterday off from work just to do that. I had gotten them wrapped and all sorts of good stuff....
This is another stamp from InkyAntics, I just love their sassy Xmas girl. So, cool! I wish I have the lyrics to Santa Baby song in a stamp or rub on, that way, I can stick them all over the place. =D
Anyway, have to go catch up on all the paper they put on my desk from yesterday...
Supplies:
Card, Ribbon, Rub-on by Making Memories
Stamp by Inky Antics
3D tree by K&Co.
Subscribe to:
Posts (Atom)